I needed a few bits and pieces before I started, so a trip to Hobbycraft was in order! Luckily, they had a whole Cake Pops display all laid out - lollipop sticks, candy melts, decorations etc...
There's quite a few Cake Pop books out at the moment, but I went for 'Pop Bakery' by Clare O'Connell. I've only used the book for the basic mix as a lot of the designs are VERY complicated (and some seemed a bit random anyway - you can make a cake pop that looks like or a tooth or a cactus if you want?).
 |
| All set |
It seems like it could become quite an expensive habit though. They suggest that you use 'Candymelts' for icing the cake pop. You can get them in all sorts of colours in Hobbycraft but they are quite pricey. Melted chocolate seems to work just as well.
For more inspiration, I looked at other recipes/designs online - www.bakerella.com (I think she's the creator of cake pops!). It was also just nice to look through them!
All in all, it was quite a long process, but I got there in the end. There were several stages to making the Cake Pops . . .
Stage One:
Make the sponge. I wanted to make two batches and went for a strawberry sponge (recipe found on http://www.bakingbar.co.uk/2011/05/strawberry-surprise-cake-pops.html?utm_source=feedburner&utm_medium=feed&utm_campaign=Feed%3A+BakingBar+%28Baking+Bar%29 ) and chocolate sponge - I got the following recipe from the Pop Bakery book:
1) Preheat oven to 160oC
2) Mix 125g butter with 125g caster sugar until light and fluffy
3) Add 2 medium eggs slowly, continuing to beat the mixture
4) Sift 125g of flour into the mix along with 2tbsp. of cocoa powder and mix until combined
5) Pour mixture into a greased 8in/20cm tin and bake for 20-25 mins (or until risen and cooked through)
6) Leave the cake to cool (for a LONG time before crumbling!)
 |
| Strawberry sponge |
 |
| Chocolate sponge |
Stage Two:
Once the cake has cooled, break up the sponge into crumbs and mix in half a tub of vanilla frosting (to save time, I cheated a bit here and used Betty Crocker's Vanilla frosting!).
Stage Three:
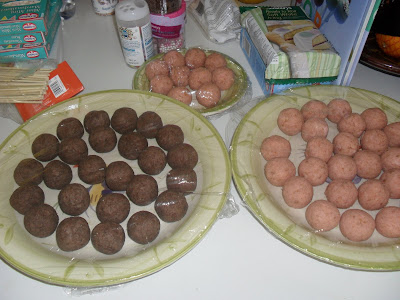
Roll the mix into balls (each ball weighing roughly 20g). The cake pop is formed!
 |
| Looks like meatballs... |
Stage Four:
Melt the chocolate (the book suggests the candy melts - who needs candy melts?). Place the cake pop on a spoon and roll it in the chocolate (this bit is messy - just go with it) and then decorate!
Stage Six:
I put a batches of them in the freezer for the chocolate to set and then finally - after all that - put the cake on the stick!
Something extra...
I made more Cake Pops than I knew what to do with, so I experimented a little. Seeing as they looked a bit like meatballs and I had some kebab sticks in the cupboard, it only seemed right that I made some Cake Kebabs! I know it sounds disgusting and it may look disgusting, but it was still fun to make!! :D
So all in all, it does seem a lot of effort for making a bitesize piece of cake on a stick! Nevertheless, I really enjoyed making them - they would make great gifts and they'd probably go down well at a kids party or something. I'll definitely make them again...but perhaps not for a while!!
I'm going to 'pop' off line for now...I'll be back soon though with more baked goods ;)


No comments:
Post a Comment